Abstract
This SWIFT-Active Screener knowledge base is designed to be a resource for users to review key elements of the software and locate responses to specific questions when learning to use the application. To quickly locate a response to a specific question, click on the question below to move to the relevant section of the document.
Introduction to SWIFT-Active Screener
SWIFT is an acronym for “Sciome Workbench for Interactive computer-Facilitated Text-mining.”
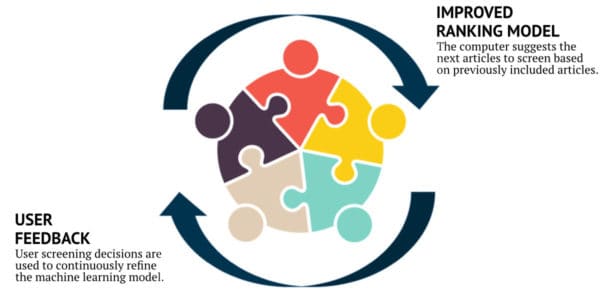
- Active Learning. Behind the scenes, Active Screener uses state-of-the-art statistical models designed to save screeners time and effort by automatically prioritizing articles as they are reviewed, incorporating user feedback to push the most relevant articles to the top of the list.
- It’s user-friendly. You can quickly and easily create screening projects, including data extraction questions to fit most any study design, without having to watch hours of tutorial videos or read a lengthy user manual.
- Real-time team collaboration. Active Screener allows teams to collaborate using a web-based interface which will enable your group to perform a systematic review anywhere, anytime. This flexibility allows for easy progress sharing and makes team communication easier to manage.
- Easy view of project progress. Active Screener’s project management tools make it easy to view your team’s progress while your systematic review is underway.
- Conflict resolution. Active Screener tracks screening conflicts and allows you to resolve them quickly and efficiently so that you can complete your review without delay.
- Data integration. Active Screener integrates with the systematic review tools that you already use. It accepts imports from many of the most popular bibliographic databases and reference curation platforms, including EndNote, Mendeley, Zotaro, PubMed, and SWIFT-Review. Results from screening activities in Active Screener can also be exported in standard data formats compatible with a wide range of applications, including EndNote, Mendeley, Zotaro, PubMed, HAWC and Excel.
During screening, as articles are included or excluded, an underlying statistical model automatically computes which of the remaining unscreened documents are most likely to be relevant. This “Active Learning” model is continuously updated during screening, improving its performance with each article reviewed. Meanwhile, a separate statistical model estimates the number of relevant articles remaining in the unscreened document list. The combination of the two models allows users to screen relevant documents sooner and provides them with accurate feedback about their progress. As a result, the majority of relevant articles can be discovered after reviewing only a fraction of the total number of abstracts, which can result in significant time and cost savings, particularly for large projects.
SWIFT-Active Screener allows you to accomplish your review in a much more efficient manner by getting you the majority of relevant articles after screening only a fraction of the total articles. The amount of time saved will vary, depending on your specific project, but on average, users can save in excess of 50% of screening effort normally required.
SWIFT-Review and SWIFT Active Screener are separate software products, but both are used in the systematic review process. SWIFT-Review provides numerous tools to assist with problem formulation and literature prioritization. You can use SWIFT-Review to search, categorize, and prioritize large (or small) bodies of literature in an interactive manner. SWIFT-Review utilizes newly developed statistical text mining and machine learning methods that allow users to uncover over-represented topics within the literature corpus and to rank order documents for manual screening.
There is some overlap between the two tools, in that both perform literature prioritization. The key differences between the two software products are:
- SWIFT-Review is dependent on the availability of an initial training seed; Active-Screener can work with or without an initial training seed.
- SWIFT-Review uses ‘traditional’ machine learning to and builds its ranking model only once; Active-Screener builds its model iteratively, in response to user interaction, such that the model continually improves as references are screened.
- SWIFT-Review provides only a ranking of the documents but no feedback on how many relevant articles are available above any given threshold; Active-Screener provides a real-time estimate of document recall so that you can know when to stop screening.
- SWIFT-Review is a desktop application that runs on both Windows and Mac; Active-Screener is web-based software designed specifically for multi-user document screening.
To obtain your free license for SWIFT Review, simply browse to the Sciome Software web page to login and/or create your SWIFT-Review account. Once you have logged in, you will find links to download the Windows and Mac installation software which you can use to set up SWIFT-Review on your computer.
No. While some users use both SWIFT-Review and SWIFT-Active Screener, you do not need to use SWIFT-Review before using SWIFT-Active Screener, and you can use each software application independently.
For pricing information about SWIFT-Active Screener, contact swift-activescreener@sciome.com.
A variety of government, academic, and industry groups currently use SWIFT-Active Screener, including:
- National Institute of Environmental Health Sciences (NIEHS)
- United States Environmental Protection Agency (EPA)
- The Endocrine Disruption Exchange (TEDX)
- John Hopkins Evidence-Based Toxicology Collaborative (EBTC)
- United States Department of Agriculture (USDA)
Howard, B. E., Phillips, J., Tandon, A., Maharana, A., Elmore, R., Mav, D., Sedykh, A., Thayer, K., Merrick, B. A., Walker, V., Rooney, A., & Shah, R. R. (2020). SWIFT-Active Screener: Accelerated document screening through active learning and integrated recall estimation. Environment international, 138, 105623. https://doi.org/10.1016/j.envint.2020.105623
SWIFT-Active Screener is a web-based, collaborative systematic review software application. It is intended to be used during the document screening phase of systematic review and scoping activities. SWIFT-Active Screener is designed to reduce the overall screening burden for a systematic review.
Accessing SWIFT-Active Screener
You do not need to install any software to use SWIFT-Active Screener. You simply need access to the internet to be able to access and use SWIFT-Active Screener. To access SWIFT-Active Screener, simply point your web browser to: https://swift.sciome.com/activescreener.
The recommended web browser for SWIFT-Active Screener is Google Chrome. When using other web browsers (e.g., Internet Explorer (IE), Safari, Firefox), there may be issues with specific presentation settings displaying correctly.
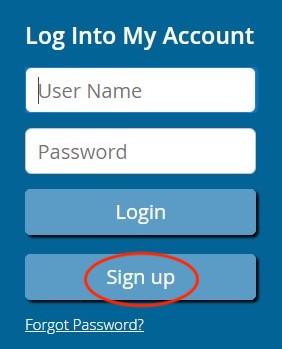
From the SWIFT-Active Screener Login page (https://swift.sciome.com/activescreener), click “Sign up.”
If you would like to change your password, you can do so from this link: https://user.sciome.com/login.
Creating a New Project
1. Click “Add New Review” button in the upper right corner.
2. Give your review a name (between 2 and 20 characters) and click “Create Screening Level.”
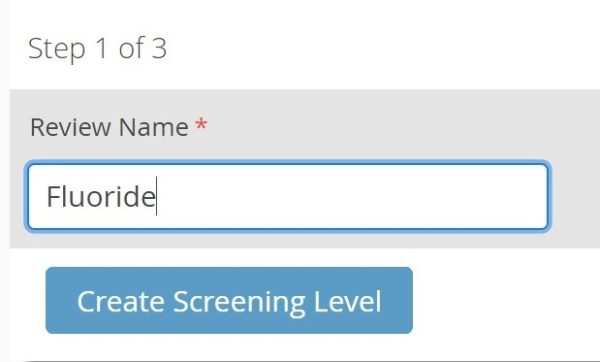
In SWIFT-Active Screener, reviews are divided into screening levels. Any article that is included by reviewers at level N can proceed to level N+1 for further screening. For example, you could set up level one as title and abstract screening and level two as full text screening.
3. Set up your screening level (e.g., Title & Abstract) questions. Note: the first question, the Inclusion/Exclusion question, is required and is always a “Yes/No” response.
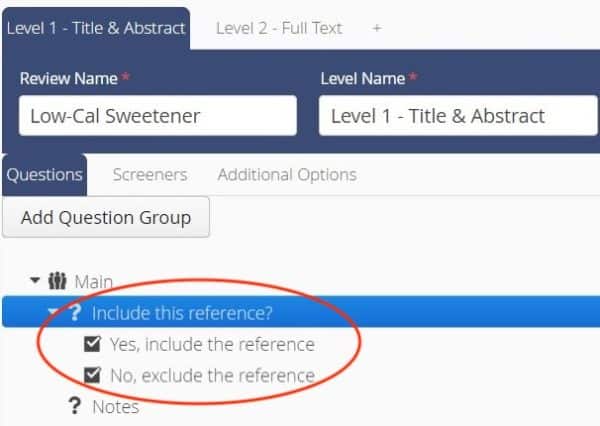
The purpose of this first question is for you to specify whether you want to include the article at this level. Active Screener will use the answer to this question to determine which articles are relevant and to build a model that can further prioritize the remaining articles for screening. This is the only question we need for every screening level. It’s the only required question.
For additional questions, you can select other response options, in addition to “Yes/No” responses, (e.g., “Unknown”) if appropriate.
4. To set up additional questions, click “Add Question” and add your question in the “Question Text” box. Select your “Question Type.”
- You can only select one question type for each question (i.e., Radio Button, Check Boxes, or Text). The default question type is “Radio Button.”
- Radio Button questions can only have one response selected.
- Check Box questions are select all that apply (i.e., more than one response can be selected).
- Text questions can be free text responses. It’s helpful to add a “Notes” Text question, to allow screeners a place to leave notes and comments about a reference.
- Be sure to click “Save,” so you don’t lose your work.
- Upload your references (outlined in the next section).
Review: Creating a New Project in SWIFT-Active Screener
- Click “Add New Review”
- Name Your Review (2-20 characters)
- Add Your Questions and Select Question Types
- Note: Inclusion/Exclusion Question is Required
- Tip: It can be helpful to add a “Notes” Question (“Text” Question Type)
- Click “Save”
- Upload Your References
You are not required to set up additional questions, but in most cases, setting up additional screening questions is helpful, in order to collect the most relevant information needed for your project.
No, there is no maximum number of additional questions.
The initial Inclusion/Exclusion question (with a “Yes” or “No” response) is required.
Additional questions may be set up as:
- Radio Button (only one answer is allowed);
- Check Boxes (more than one answer can be selected);
- Text (free text).
- Tip: We suggest that a “Notes” question, which is a “Text” question type be added, to allow screeners to input any additional notes they might have about a reference.
The keywords and additional questions are used to guide screeners as they are reviewing articles; they do not affect Active Screener’s machine learning capability. Only the content of the articles themselves (title, abstract, etc.) is used by the machine learning. The machine learning is based on whether screeners include or exclude a specific reference. Active Screener automatically prioritizes articles as they are reviewed and suggests the next articles to screen based on previously included articles. Initially, articles are going to be presented in random order because you haven’t provided any sort of feedback to help the system build a model of relevance. But as you start screening, the system will start looking at the articles you include and exclude and start changing the presentation order of references, in order to show you more references that are likely to be relevant.
Keywords are used to draw your eye to important words in titles and abstracts as you are screening. If you add the word “zebrafish,” and add it as an included keyword, whenever this term appears in the title or abstract it will be highlighted in the inclusion color. On the other hand, if you’re not interested in “mouse,” you can add that to the exclusion keywords and if this term appears in an article it will be highlighted it in the exclusion color.
The number of inclusion and exclusion keywords that you use may vary depending on the project, but there is no maximum number of inclusion or exclusion keywords. Keywords are used to draw your eye to important words in titles and abstracts as you are screening, but keywords are not directly used by the machine learning, therefore, how many (if any) keywords you use will not impact the machine learning performance.
You can add inclusion/exclusion keywords in bulk by copying and pasting them into the keyword fields and selecting “Save.”
You can add inclusion/exclusion keywords with wildcards by checking the box that states: “Please select if all the above keywords contain wildcard” and entering the keywords with wild cards in the following format:
chromosomal aberration\w*
anomal\w*
variant\w*
infan\w*
\w*pyrene
Chromosom\w* aberration
\w (means any alphanumeric character)
If you also want to add inclusion/exclusion keywords without wildcards, you will need to add and save these keywords separately in Active Screener.
SWIFT-Active Screener can use a training seed to help the software to build the prioritization model more quickly. However, providing a seed is optional and the seed can only be provided before the screening process starts. Currently, Active Screener allows users to upload only relevant documents as a training seed and ideally, these documents would be a ‘representative’ sample of the types of the documents you expect to encounter in the dataset. The seed can be provided in RIS, BibTex, EndNote XML or PubMed XML format.
In most systematic reviews, positive (included) articles are significantly outnumbered by negative articles. Therefore, we don’t currently have an explicit mechanism for uploading negative examples, as many such examples are likely to be encountered by chance during screening. Instead, the user is only required to upload examples of positive (relevant articles) when specifying the seed.
In addition to specifying references as a seed set, there is also the option to move specific references to the top of the list to be screened. This can be a good option if a user has a set of relevant references that they want to screen first and inform the model. These references won’t be the part of the model unless the user screens them. You can select specific references to be moved to the top from the Manage References screen and selecting the dash next to the specific reference(s). The “Move to Top” functionality is disabled after 10% of references are screened.
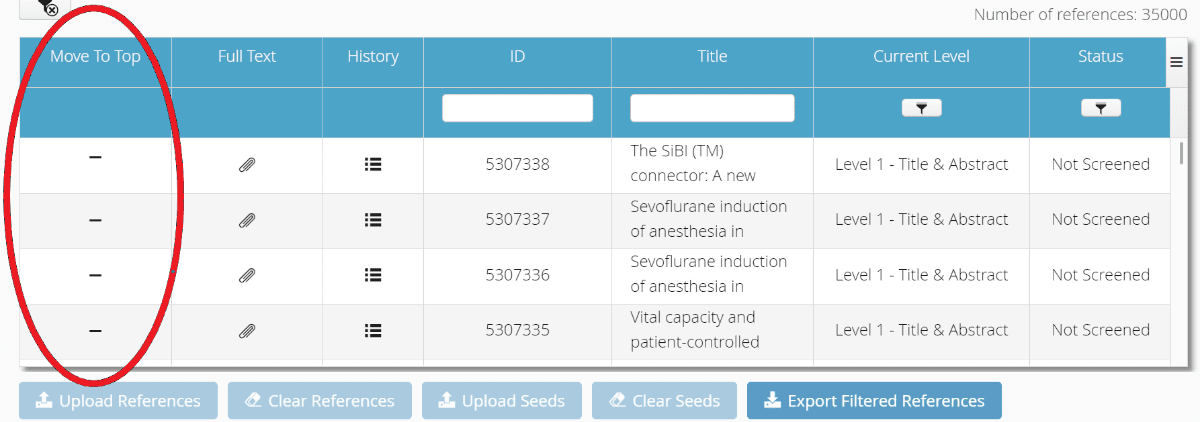
After selecting a specific reference to be moved to the top, the dash will be changed to a check mark as shown below.

Users can also use the “Move to Top” function to select a set of references to be moved to the top of list of references to be screened (versus selecting them individually). To use the bulk Move to Top function, when uploading references, select the “Move all the uploaded references to the top for screening” checkbox and then select “Finish.”
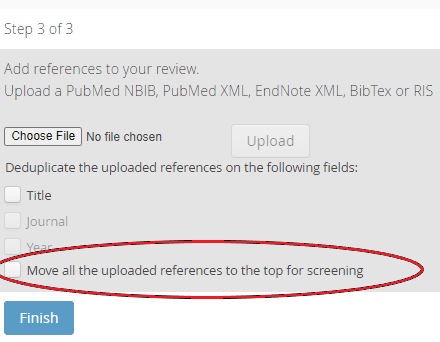
Utilizing seeds and/or moving references to the top for screening can be used to help build the prioritization model more quickly. The main difference is that seeds will not be screened whereas references moved to the top remain in the project and will be screened.
It is not required to use either seeds or move references to the top for your project, and the prioritization model will still be built without use of a seed set or moving references to the top.
We added the ability to clone a project in the event that a user wants to quickly recreate or clone an existing project. This functionality allows you to copy References, or Project Settings, and/or Screeners, and also gives you the option to use included references as Seeds in a cloned project.
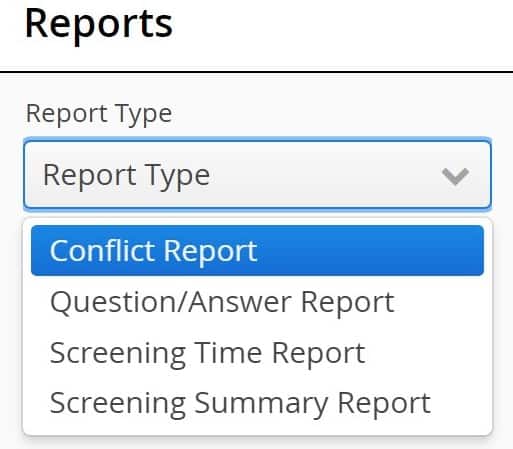
The fourth icon (graph) is the “Project Reports” menu option. This takes you to a page that lists the reports that are available (i.e., Conflict Report, Question/Answer Report, Screening Time Report, and Screening Summary Report, Ranked References Report, and PRISMA Report).
Uploading References
- Click “Choose File” and browse to that file.
- If necessary, you can de-duplicate the uploaded references using various fields: title, journal and year.
- Click the “Upload” button to upload the data.
- After upload, you will see a message indicating that your references were successfully imported (e.g., “1531 references were successfully imported”).
- Click “Finish.”
- If you need to add additional references from other databases, click the “Manage References” icon and then click “Upload References” to repeat the process.
SWIFT-Active Screener supports a variety of file types for import: PubMed XML (eXtensible Markup Language) files, which are results of PubMed searches saved from the PubMed website, EndNote XML, and the standard bibliographic file formats BibTeX and RIS.
Yes, you can upload references from multiple databases. Keep in mind that if you are using the “Active Learning” function (which most users will), you must upload all references before people start screening them. Once screening begins, the “Upload References” button will be disabled.
Review: Uploading References in SWIFT-Active Screener
- Click “Choose File”
- Note: PubMed XML, EndNote XML, BibTex, or RIS formats are supported
- Browse to Your File
- Tip: Deduplicate if needed before uploading
- Click “Upload”
- Click “Finish”
- Tip: Upload all references before screening begins
Active Screener uses its own unique ID for each reference, but in most cases the tool will still keep track of the Identifiers from the other databases the data was imported from. For example, in the case of HERO data, if you import directly from a HERO RIS file, the HERO IDs will be internally associated with each record. When you import the RIS file, make sure you pick the appropriate source – in this case “HERO” from the dropdown that looks like the following:
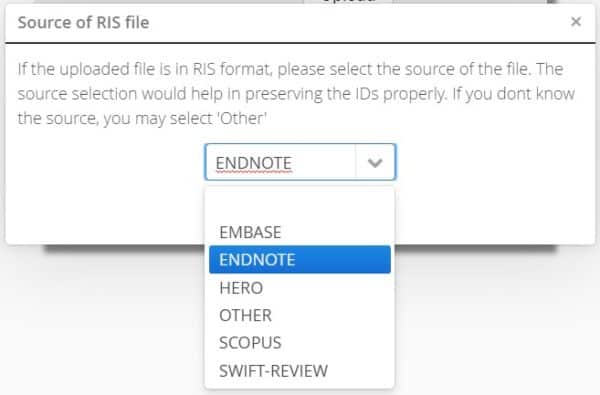
Similarly, if you import the data from an RIS file that has been exported from a SWIFT-Review project having references that originated from HERO, the HERO IDs will be stored in Active Screener. If you later need to get the data back out of Active Screener, you have the option of exporting the data in the form of an Excel file or an RIS file. In both cases, the HERO ID will be exported along with the file.
Yes, you can select “deduplicate” when uploading references. You can select deduplication by: Title, Journal, and/or Year.
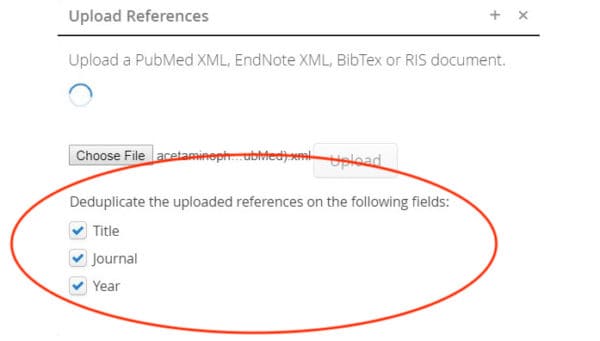
After uploading references, you will see a message indicating the total number of references uploaded. For example, the image below shows that out of 8,773 references, 8,759 were imported (14 duplicates were removed since I had selected deduplication by Title, Journal, and Year before uploading).

We have handled reviews with approximately 100,000 references in the past without difficulty.
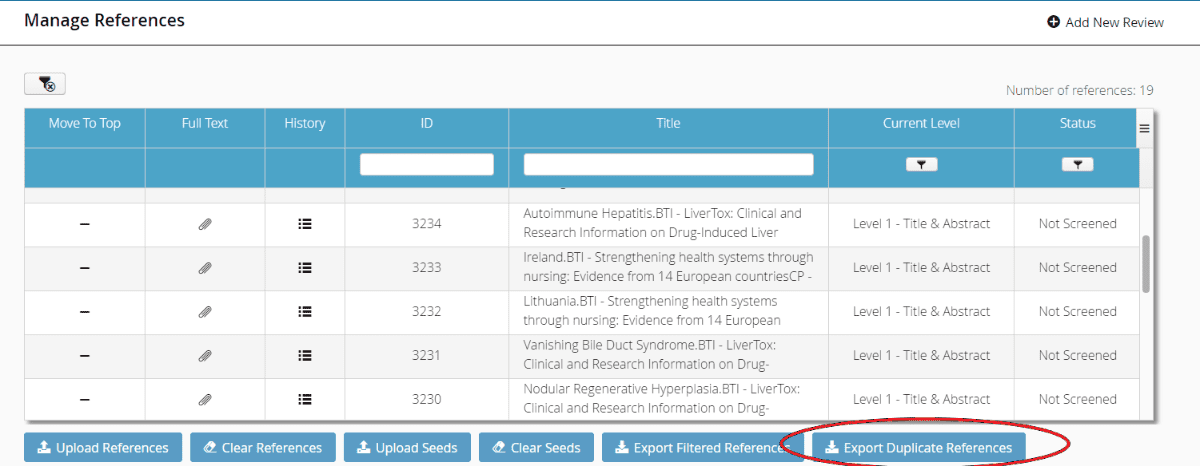
When you upload references to your project, after selecting the applicable deduplicate functions, uploading the reference file, and selecting “Finish,” you will be able to select “Export Duplicate References” from the Manage References screen.
Adding and/or Inviting Reference Screeners
Click on the icon that looks like a gear and this will take you to the “Edit the Review” screen.
Click “Display Additional Options” at the bottom of the screen.
If there’s a user that’s not on this list, you can invite them by clicking the “Invite” button. Add your new screener’s first and last name and enter their email address twice.
This will add them to your address book and after they log into their Active Screener account and accept the End User License Agreement (EULA), they will see your project under “My Reviews.”
Note: if the screeners you are adding to your project do not already have an Active Screener account, they will need to have an account set up before they can begin screening.
Contact swift-activescreener@sciome.com to submit new user requests.
Remember: if you are adding someone to your project, they must first have an Active Screener account set up before they can log into the application and view your project.
Review: Adding New Reference Screeners to Your Project
- Click the “Edit the Review” icon
- Click “Display Additional Options”
- Click “Invite”
- Enter their first name, last name and email address
- Click “Send Invite”
- Click on the icon that looks like a gear and this will take you to the “Edit the Review” screen.
- Click “Display Additional Options” at the bottom of the screen.
- Select the appropriate user from the list of existing users.
- Select their appropriate screening role (“Level Screener” or “Project Admin”).
If you have a review that has more than one level, you can designate different screeners at each level.
Review: Inviting Existing Users as Reference Screeners
- Click the “Edit the Review” icon
- Click “Display Additional Options”
- Select the appropriate user role: “Level Screener” or “Project Admin” next to their name
- Click “Save”
Level Screeners can do all basic tasks: title only screening; title and abstract screening; and full text screening; view references; reviews; access basic reports; and answer questions.
Project Admins can do all “Level Screener” tasks, plus additional tasks, including: setting up questions; assigning screeners; changing project settings; managing other users’ responses (e.g., they can intervene to resolve a screening conflict between screeners); and accessing additional reports.
Yes, anyone who creates a project is automatically designated as a Project Admin.
Yes, Project Admins can also designate other users as Project Admins, as needed.
No, there is no maximum number of Project Admins that can be assigned to a specific project.
Changing Project Settings
The default is “1” but this number can be changed, based on your project needs. Most systematic reviews, for example, require each citation to be dual screened, so you would change the number to “2.” You may choose to leave it at “1” if you’re working on a personal project, or just doing some scoping. Alternatively, you can also set it to a higher number, depending on your project needs. For example, if you are in a pilot phase, and want everyone on the project to do reference screening, you may wish to select a higher number.
- From the “Edit the Review” screen, locate the “Keyword” field.
- Enter your keyword, then click “Add Include Keyword” to add a keyword that will be highlighted as an inclusionary keyword.
- Enter your keyword, the click “Add Exclude Keyword” to add a keyword that will be highlighted as an exclusionary keyword.
You can also add keywords that will be highlighted in titles and abstracts to draw your eye to important words. And you can have different lists for both inclusion and exclusion. If you add the word “zebrafish,” and add it as an included keyword, then whenever this term appears in the title or abstract, it will be highlighted in the inclusion color (green). Alternatively, if you’re not interested in “mouse,” you can add that to the exclusion keywords and if this term appears in the article, it will highlight it in the exclusion color (red). Note: the process of adding keywords for highlighting as inclusion and exclusion keywords won’t affect the inclusion or exclusion status, but it will draw the eye to those words to help screeners make decisions.

Review: Adding Inclusion and Exclusion Keywords
- From the “Edit the Review” screen, locate the “Keyword” field
- Enter a keyword and click “Add Include Keyword” to add as inclusionary keyword
- Enter a keyword and click “Add Exclusion Keyword” to add as exclusionary keyword
- Click “Save”
From the Screening References page, click the “Detailed Screen” option, which will take you to the full screening page. Then you can click on “Inclusion Color” or “Exclusion Color” to modify the colors that are used for keyword highlighting in the title and abstract.
(Rich text edit box so you can bold text or have lists.)
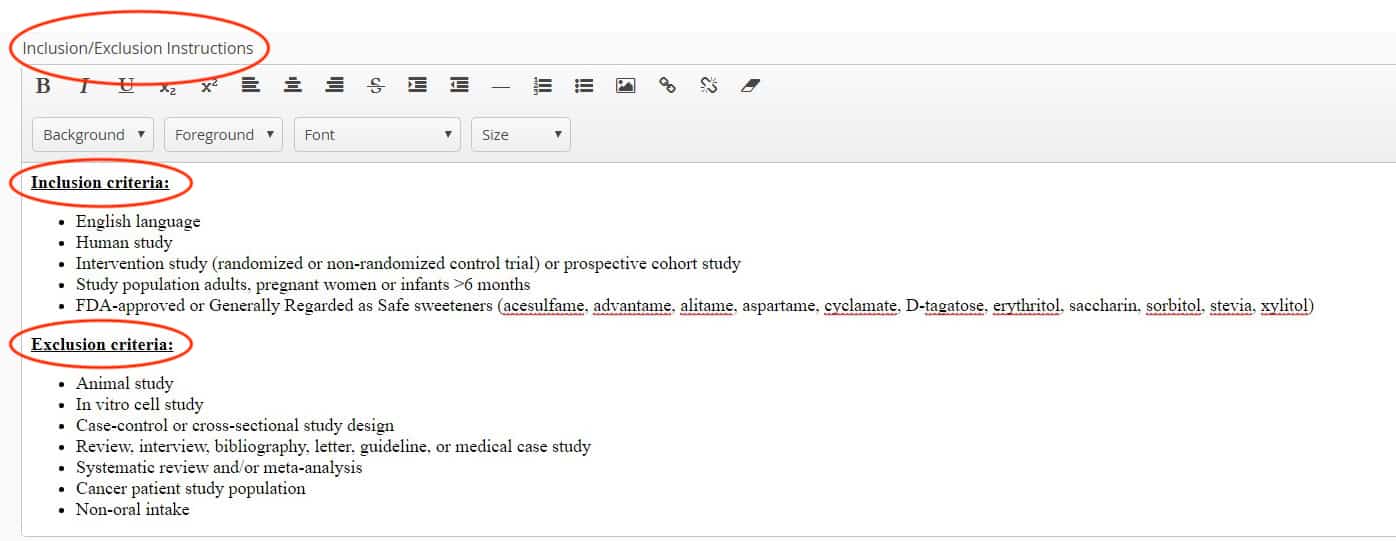
From the “Edit the Review” screen, you can provide detailed inclusion/exclusion instructions below the section titled “Inclusion/Exclusion instructions.” This is a rich text edit box, so you can do things such as bold or italicize text, copy lists, etc. Be sure to click “Save” when you make selections/updates, so you will not lose your work.
Review: Adding Inclusion and Exclusion Keywords
- From the “Edit the Review” screen, locate the “Inclusion/Exclusion instructions” field
- Enter your inclusion/exclusion instructions
- Tip: You can copy lists, bold or italicize text as needed
- Click “Save”
This is the default reference presentation method, which indicates that “active learning” is being used. In most cases, you will want to use this setting.
This is where you can decide to use active learning or not. Generally, for Level 1 screening you will be using active learning, so you can just leave the default “Predicted Relevance” setting as-is.
In the event you do not want to use active learning (e.g., you’re doing a pilot screening project or for whatever reason you don’t want to use active learning), you can also change the setting from “Predicted Relevance” to “Random.” In order to apply these settings, make sure you click “Save.”
Screening References
Click the icon that looks like a magnifying glass in the menu; this will bring you to your screening list. The SWIFT-Active Screener application will present you the top list of articles that it thinks should be screened next, according to the active learning algorithm.

Initially, articles are going to be presented in random order because you haven’t provided any sort of feedback to help the system build a model of relevance. But as you start screening, the system will start looking at the articles you include and exclude and start changing the presentation order of references, in order to show you more references that are likely to be relevant.
There are two ways to screen a reference; you’ll notice there are buttons for “Include” and “Exclude.” So, if you are doing title screening, you can simply click the applicable button to include or exclude the article.
For example, you can exclude an article by clicking the minus sign under the “Exclude” header. You’ll also notice inclusion and exclusion keyword highlighting, depending on how you set up your specific project. Here the word “human” is an inclusion keyword and that’s getting highlighted in the inclusion color (light green).

The article ID shown in SWIFT-Active Screener is a unique identifier generated by the application to identify a specific article and which allows you track an individual reference as it moves through the project.
If you hover your mouse over the title, you will see a pop up that will show full publication details: title, the journal, authors, abstract.
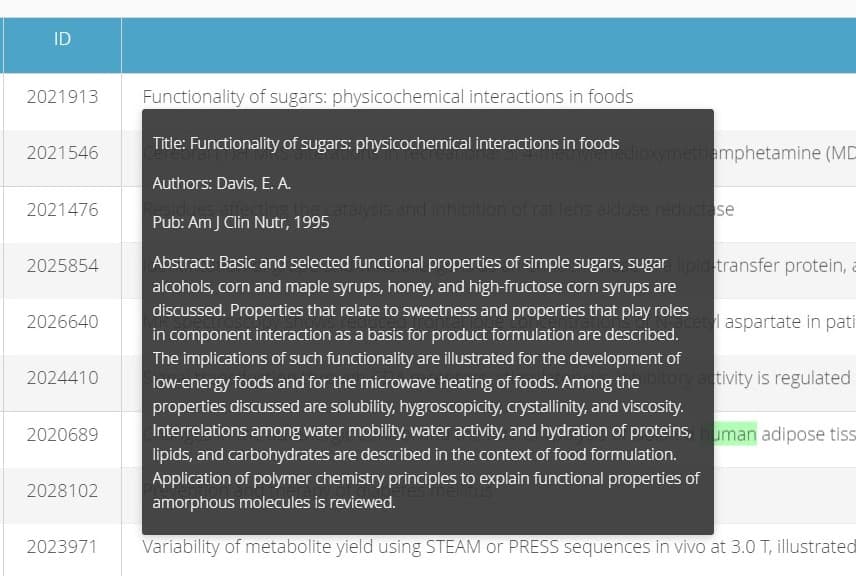
In most cases, you will do your work using the “detailed screening” option (versus “title only” screening). If you are doing title only screening, then you will not need to click on the “detailed screening” option when screening references. Note: If you do “title only” screening, you will not see any optional questions; you only see optional questions if you use the “detailed screening” option.
After selecting the “Detailed Screening” option, you can click “Display Instructions.” This will display any detailed screening instructions that were set up to help guide screening decisions.
The typical process for screening is to read the title and abstract, answer the optional questions, and indicate whether a specific reference should be included or excluded. As soon as you’ve made a choice for the required “Inclusion/Exclusion” question, the “Save and Next” button will be enabled. When you click the “Save and Next” button, the application will immediately show you the next reference, where you will repeat the same screening process.
Review: Typical Screening Process in SWIFT-Active Screener
- Select the “Screen References” icon
- Click “Detailed Screening”
- Read Title and Abstract
- Tip: Click “Display Instructions” to view detailed screening instructions
- Answer the required Inclusion/Exclusion Question
- Answer Optional Question(s)
- Click “Save and Next” to continue and review the next reference
In SWIFT-Active Screener, reviews are divided into screening levels. Any article that is included by reviewers at level N can proceed to level N+1 for further screening. For example, you could set up Level 1 as title and abstract screening and Level 2 as full-text screening (versus title and abstract screening).
Level 2 screening questions are used to guide screeners as they are reviewing articles; they do not affect Active Screener’s machine learning capability (which currently only functions for level 1 screening, anyway). Any information that users enter is recorded in the Active Screener database and will be available for reporting purposes.
For Level 2, a typical thing to do is to attach full text documents. So, in this case you can attach the full text pdf documents by clicking the paper clip icon. And then you can browse on your hard drive and find a PDF document to attach. If you originally imported your references from an EndNote library, you may be able to upload all of your documents using a special utility designed for this purpose (contact us at swift-activescreener@sciome.com for more information).
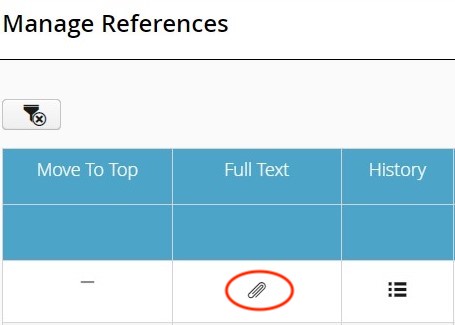
In SWIFT-Active Screener, you can have up to a maximum of four levels in a single project. In most cases, projects have one level (title and abstract screening) or two levels (Level 1: title and abstract screening and Level 2: full-text screening).
It is not required, but it can be helpful to have screeners working at similar times because in some cases (if you are dual screening, meaning each reference must be screened twice), one screener may screen many more references and then other screeners have to “catch up.” It can sometimes cause confusion because the person who screens many more references will see the ‘you can stop screening’ message although the group has not yet reached the 95% estimated recall point, since a number of references still need to be screened by a second reviewer, and this remaining screening may generate conflicts and affect the model and also estimated recall.
It is also possible that if one screener screens many more references than other screeners that you could end up screening past the 95% estimated recall point in order to catch up and complete dual screening all references.
Monitoring Progress
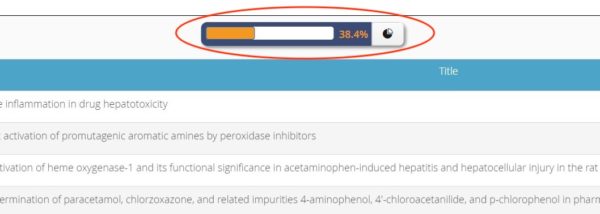
The progress bar shows you the percentage of total documents that have been screened to date. Note that this progress bar has nothing to do with recall, it’s simply showing you that of the documents on a particular level, ‘X’% of the total documents have been screened (see example below showing that for this level, 38.4% of total documents have been screened):
When you have reached the predicted inclusion threshold, you will see a message indicating that you may stop screening.
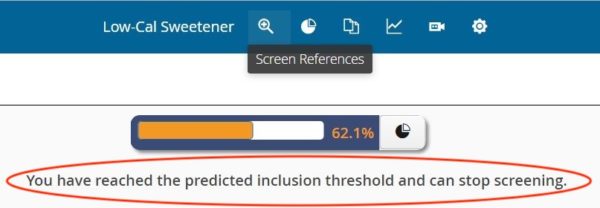
To view a detailed summary of screening progress, click the button that looks like a pie chart and this will take you to the “Review Summary” screen.
You’ll see is that at the top, right side of the screen, there is a dropdown that indicates you are “Viewing Project As” [Last Name, First Name]. This indicates you are viewing the project progress of a specific user, and that the results shown pertain to the individual selected from the dropdown menu. For example, you will see that Rebecca Elmore personally screened 1,357 out of 3,574 titles and abstracts in Level 1, and Rebecca screened 479 references as “included” and the other 878 as “excluded.” If you hover over the “Included” and “Excluded” bar charts, you will see the specific number of references represented by each chart. This information is also represented in the pie chart shown on the screen.
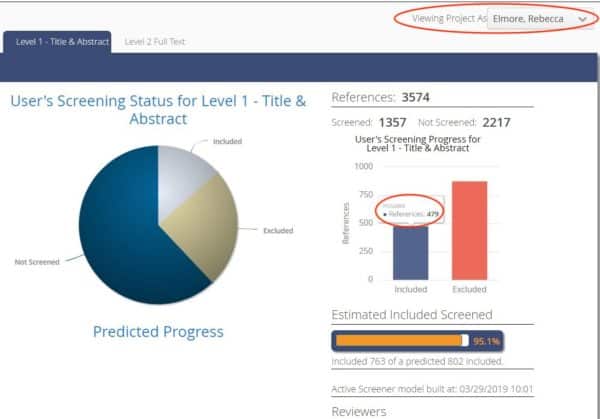
From the same screen, you will see that the machine learning has estimated that overall (among all reviewers), 763 articles have been included. The screen also shows that it is estimated that – in total, there may be as many as 802 included articles in this project; and the estimate recall as a percentage is roughly 95.1%.
Review: What is Included on the Review Summary Screen
- Individual user screening progress
- Overall screening progress
- Predicted Progress Graph
- Note: The Predicted Progress Graph only becomes visible once ~10% of total references have been screened
- Estimated recall percentage
- Tip: This screen can help you decide when to stop screening (when you’ve achieved a sufficient level of recall)
The predicted progress graph (which becomes available once you have screened approximately 10% of the total references), shows you the estimated recall so far as a function of the absolute number of documents screened.
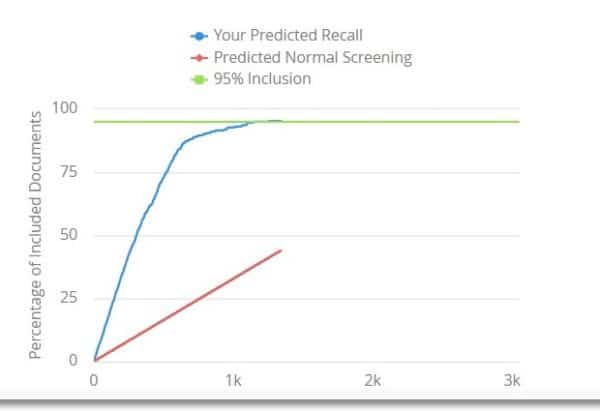
If you were screening in random order, the expected percentage of documents needed to obtain 95% recall would be 95% of the total documents. And to achieve 50% recall, you’d have to screen 50% of the articles. Generally speaking, expected recall in the random ordered scenario recall is simply equal to the percentage of documents screened so far. And that’s represented by the red diagonal line. For the project represented in the graph above, using the prioritized article list, I was able to obtain 95% recall after screening 44% of the total documents rather than 95%.
Click on the project tab that shows the project name, and you will be able to view an overall “Project Status” summary. Progress is shown by screening level.
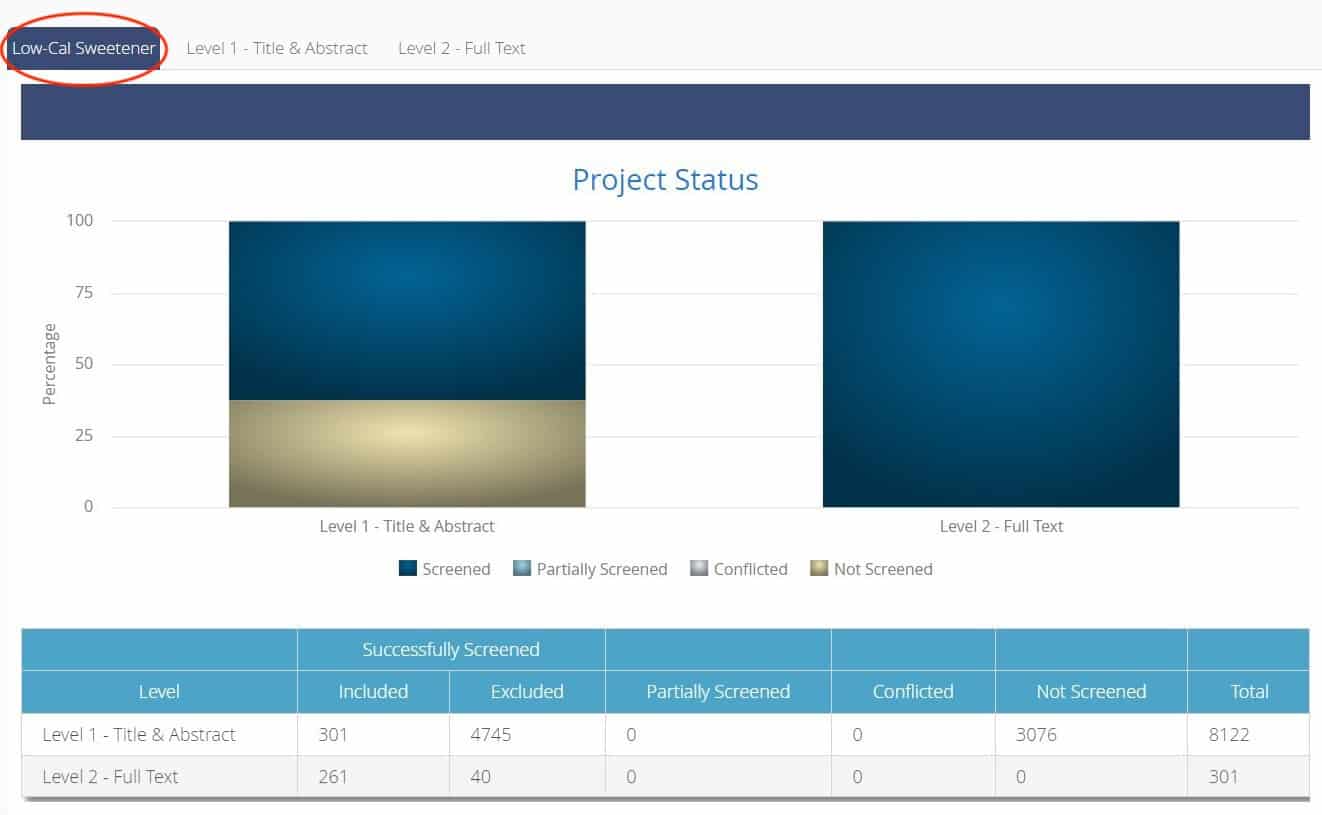
Review: What is Included on the Project Status Screen
- Total Number of Included References
- Total Number of Excluded References
- Total Number of Partially Completed References
- Total Number of References Not Screened
There are couple of conditions which determine when the SWIFT-Active Screener model gets built:
- The user must have screened at least one included and one excluded reference.
- When the project is created, the number of references required to build the model is set to 2.
- One of the references must be included and one must be excluded to build the model (#condition 1)
- If both references are either included or excluded, the model won’t build. It will be built after an increment of 30 references, given condition #1 is satisfied.
- After that, the number of references required to build the model is set to an increment of 30. Meaning the model will build after 30 screenings each time, given condition #1 is satisfied.
- In addition, there must be a gap of 2 minutes between the last model built and the current model built.
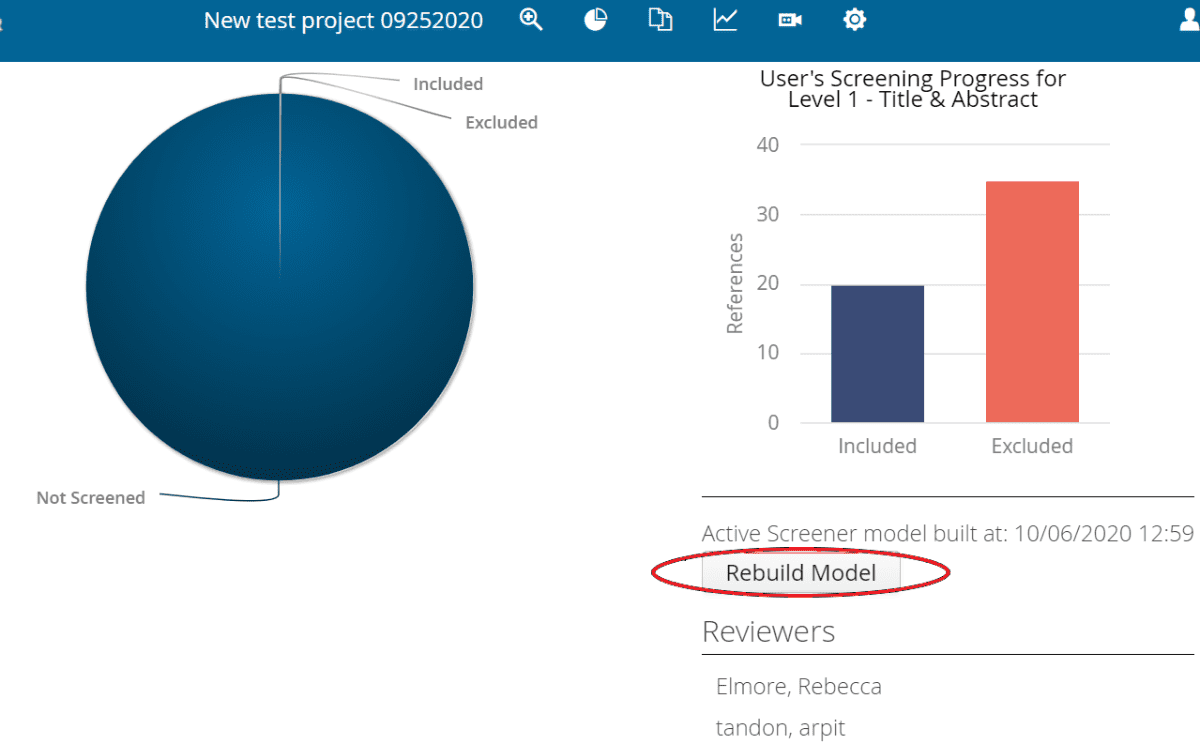
Yes. The prioritization model will still automatically rebuild on its own (once at least one “include” and “exclude” have been identified) after 30 references are screened. What the “Rebuild Model” allows you to do is force a manual rebuild. If you select “Rebuild Model,” it will not change anything or cause any issues for your project or with screening.
Resolving Screening Conflicts
Go to the “Screening References” page; if there are screening conflicts that include you as one of the screeners, there will be a message at the top of the screen notifying you. This message will tell you the exact number of screening conflicts that you are a part of.

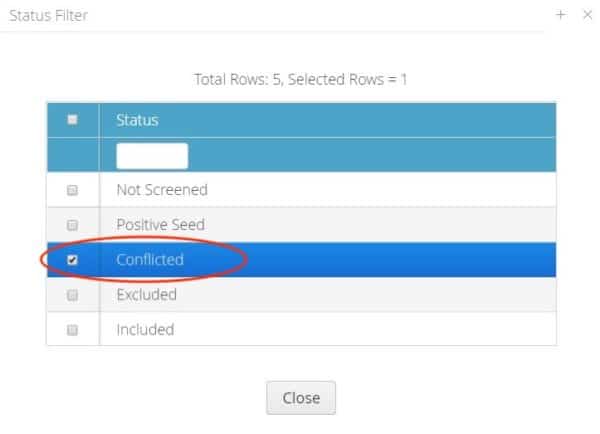
To see all screening conflicts, go to the “Manage References” screen and sort status by “Conflicted.”
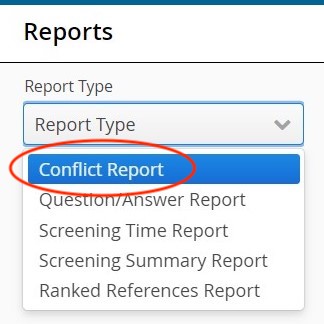
You can also go to the Reports page and select “Conflict Report.”
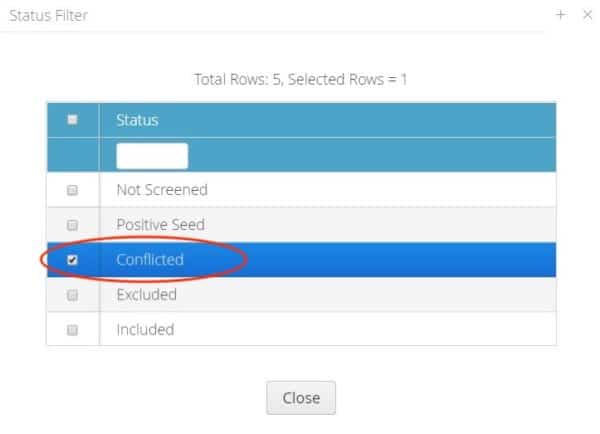
From the “Manage References” page, select “Conflicted” from the “Status” dropdown and then select “Close.”
If you click on the “History” of a specific reference, you will be able to view additional details.

After viewing the “History” and determining how the conflict should be resolved, click “Edit” next to the screening response you wish to override and update accordingly. Note: Individual users can go back in and edit their own “inclusion/exclusion” responses, but only “Project Admin” users can override another screener’s determination.
We do recommend that conflicts be resolved fairly quickly and that conflicts be kept to a low number if possible, since resolving conflicts quickly helps improve the model as it learns from your inclusion/exclusion decisions. If there are a lot of conflicts built up and then they are resolved at one time, and if there are more than few conflicts which are resolved as excluded, there might be a significant effect on the model.
If there are a lot of conflicts built up and then they are resolved at one time, and these include several conflicts that are ultimately resolved as “excluded,” this could significantly affect the machine learning model and estimated recall for the project. By resolving conflicts to “excluded” as the final status, the inclusion criteria changes for the model.
Managing References
From the “Manage References” screen, enter the reference ID in the “ID” search box.
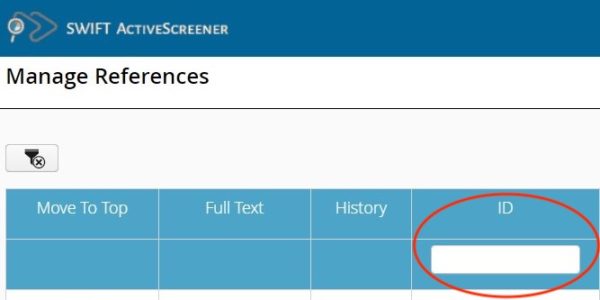
From the “Manage References” screen, enter the title in the “Title” search box.

From the “Manage References” screen, click the arrow next to “Status” to view the dropdown menu. You will see the list of options shown in the list below. Note: some of the options may not appear; for example, if you have not uploaded a positive seed set for your project, you will not see the “Positive Seed” option.
- Not Screened: Refers to references that have not yet been screened by a single screener or multiple screeners.
- Included: Refers to references that have been screened and selected as “Included” by single or multiple screeners.
- Excluded: Refers to references that have been screened and selected as “Excluded” by single or multiple screeners.
- Conflicted: Refers to reference screening decisions that are in conflict among two or more screeners.
- Partially Completed (Included): Refers to references that have been partially screened as “Included.” Additional screening is pending.
- Partially Completed (Excluded): Refers to references that have been partially screened as “Excluded.” Additional screening is pending.
- Positive Seed: Refers to references that were uploaded prior to screening as examples of relevant “Included” references to build the model before the beginning the screening process. Providing a seed is optional.
From the “Manage References” screen, click the “Level” button and select the appropriate level you wish to view (Level 1 – Title and Abstract Screening or Level 2 – Full Text Screening).
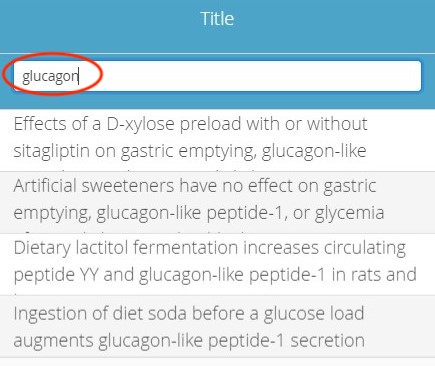
You can also use the “Title” search box to help find articles by searching for words in the title and abstract. For example, if I would like to find articles about “glucagon,” I can type in that word and it narrows the results to show articles where glucagon is found in the title or abstract. And I can do the same thing with the author names, etc.
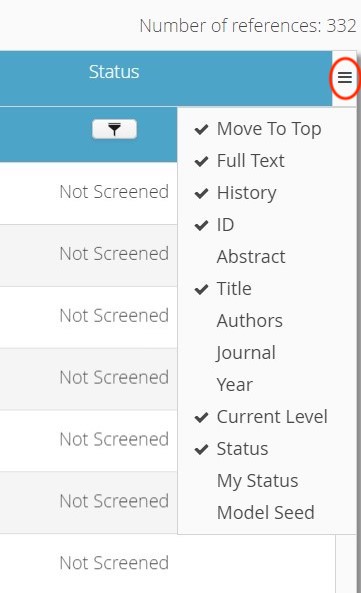
Another helpful thing is the list icon in the top right corner of the “Manage References” screen. If you click this icon, you can modify what fields are shown in the list. For example, suppose I’d like to add the authors. I can add the check beside “Authors” to also show the authors of each article. Also, I can resize columns by dragging the column headers, and I can change the sort order as well by clicking the title bar.

When you are ready to upload references for a project before you have started screening, you can select the “Upload References” button to upload your reference file.
SWIFT-Active Screener supports a variety of file types for import: PubMed XML (eXtensible Markup Language) files, which are results of PubMed searches saved from the PubMed website, EndNote XML, and the standard bibliographic file formats BibTeX and RIS.

When you want to upload a positive seed set to a project before you have started screening, you select the “Upload Seeds” button. See question above: Creating a New Project > How do I use a training seed in my project? for more information about seed sets.
SWIFT-Active Screener supports a variety of file types for import: PubMed XML (eXtensible Markup Language) files, which are results of PubMed searches saved from the PubMed website, EndNote XML, and the standard bibliographic file formats BibTeX and RIS.

When you want to remove your positive seed set from a project, you can select the “Clear Seeds” button. You can not clear a subset of seeds by using this function; you will clear all of the seeds.

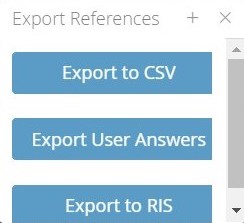
When you want to export references by specific status(es), you can use the “Export Filtered References” function. You can export your references in CSV or RIS formats.
Yes, you can remove all references or all positive seeds from a project if you have not started screening yet by selecting the “Clear References” or “Clear Seeds” button.
No, when you select “Clear References” or “Clear Seeds” function, you will remove all references or seeds. You cannot remove a subset.

When you want to remove all references from a project, you select the “Clear References” button. You can not clear a subset of references by using this function; you will clear all of the references.
At this time, you can’t clear or remove references after you have begun screening on a project. However, you can easily recreate a project by “cloning” it when you create a new review.
If additional references are added after screening has begun, this will affect the “when2stop” algorithm. As a result, we strongly encourage users to upload all references before screening begins. In rare cases, there is a workaround available, which is not recommended if a large percentage (>10%) of references has already been screened. If the Reference Presentation Method is set to “Random,” additional references can be uploaded from the Manage References view. After uploading additional references, be sure to set the Reference Presentation Method back to “Predicted Relevance” and Save your changes.
Please note that using this workaround will affect the “when2stop” algorithm and estimated recall value. In addition, the impact will be greater if additional references are uploaded in later stages of the screening, and also depends on the number of additional references uploaded.
Exporting Data
Go to the “Manage References” screen and use the filtering mechanisms (using the filtering dropdowns and the search) to select the articles as needed. After selecting the appropriate articles, click the “Export Filtered References” button.
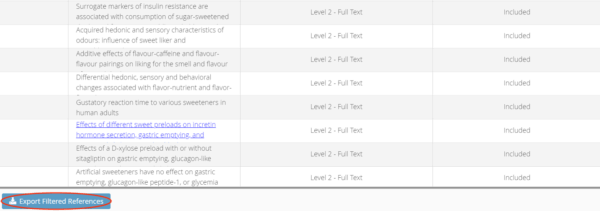
You can export data from SWIFT-Active Screener in Excel or RIS formats.
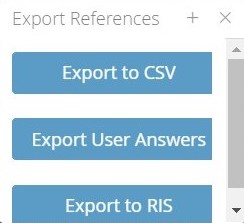
Click “Export to csv” and it will create the file for download and automatically name the file “ReferenceExport.csv.” Save the file and open it in Excel.
Click the “Export to RIS” button and that will export the records and save as them an RIS file, which is a standard bibliographic format that can be imported into a variety of reference management programs, including EndNote, SWIFT-Review, Health Assessment Workspace Collaborative (HAWC), Mendeley, etc.
Click the “Export Filtered References” from the “Manage References” screen and choose “Export User Answers.”
Results from screening activities in Active Screener can be exported in standard data formats compatible with a wide range of applications including EndNote, Mendeley, Zotaro, PubMed, HAWC and Excel. For example, reference lists can be filtered by various status codes (included, excluded), etc. and exported to RIS format for import into external tools. Data can also be exported to Excel for further analysis.
We are currently working on tighter integration with tools like HAWC and may be able to work with you to implement any additional reporting or interoperability requirements that your organization may have.
To generate a PRISMA Report, go to the “Reports” section and select “PRISMA Report” from the dropdown list.
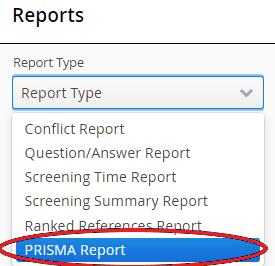
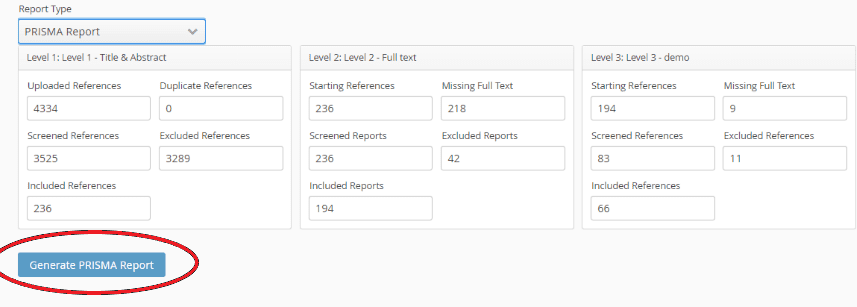
You will see information from Level 1 and Level 2 (if applicable) generated in the PRISMA Report. You can modify the information in the text boxes before generating the PRISMA Report if needed. Click “Generate PRISMA Report” to generate the PRISMA Report.
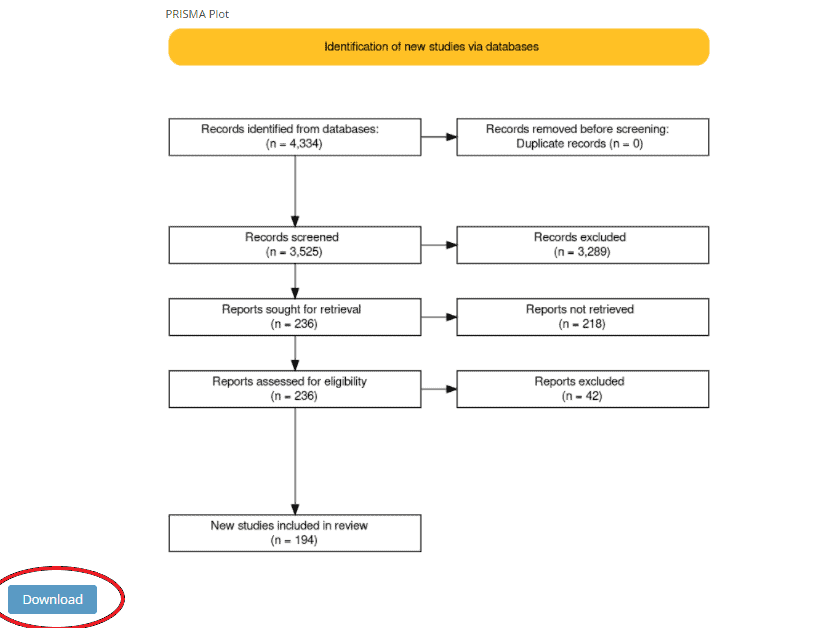
Click “Download” to download the PRISMA Report as a .png file.
Reports
The Conflict Report allows you to review and/or modify screening conflicts by screening level and across screeners. You can review conflicts across all questions and responses and for all users. Individual screeners (who are not project administrators) may change their own screening decisions by selecting their decision for a specific reference under the “Decision” column. Project administrators may edit screening decisions for all screeners on a project. Project administrators can resolve a conflict either by clicking the decision under the “Decision” column for an individual screener, or by selecting options under “Resolve Multiple Screeners.”
There are two options available under “Resolve Multiple Screeners”:
- Resolve to Majority
- Applicable only if there is majority in screeners’ decisions. For example, in the screenshot below, in the first row, there is a majority decision of “No, exclude the reference” so “Resolve to Majority may be selected.” In the second row, there is no majority decision, so “Resolve to Majority” is greyed out and not able to be selected.
- Applicable only to radio button format questions
- Applicable only if the majority answer doesn’t lead to another question
- Resolve
- Allows a project administrator to resolve conflicts quickly for all screeners by selecting the desired answer. For example, in the second screenshot below, a project administrator can select “Resolve” to quickly resolve the screening conflict in which “Death” was selected as an outcome by one screener.


Conflict Report data can be exported as a .xlsx file. If multiple questions are selected to generate the report, the exported excel file will have multiple sheets each corresponding to the selected questions. There will also be one sheet with a conflict summary.
The Question/Answer report allows you to review and/or export answers to the “include/exclude” (required) question as well as any other screening questions you have set up for your project at each screening level. Questions and answers can be exported as a .csv file.
The Screening Time Report allows you to see users’ average and total screening times by project level. The software calculates the amount of the time taken between each consecutive screened reference. If there is more than 10 minutes in between screening references, the software does not use this for the time calculation. You can export Screening Time data in graph or table formats (.svg or .csv).
The Screening Summary report shows a breakdown of individual screeners’ “Included,” “Excluded,” “Conflicted,” and “Not Screened” references by project level. You can export these data as a .csv file.
The Ranked References Report shows the references in order of likelihood of being “included” predicted by the machine learning model (assuming you have selected predicted relevance for your reference presentation method and the model has been built once). The order will keep changing as the model keeps rebuilding itself as screeners include/exclude references.
The ranked references report also shows the status of each reference in training the model as well as the current status. Any references that have not been screened will not have been used to train the machine learning model and their “Status in Training” will appear as “None” and their “Current Status” will appear as “Not Screened.”
“Rank” only matters for the references which are NOT part of the training set. So, for already screened references that are part of the training set, “rank” is just a random number. All other references will be ranked according to the machine learning model prediction. The Ranked References report can be exported as a .csv file.
The “PRISMA Report” is a flow diagram depicting the flow of information through the various phases of a systematic review. The report shows the number of records identified (including duplicates) as well as included and excluded records. The report can be manually edited before generating the diagram and selecting “Generate PRISMA Report.” The PRISMA Report can be downloaded as a .png file.
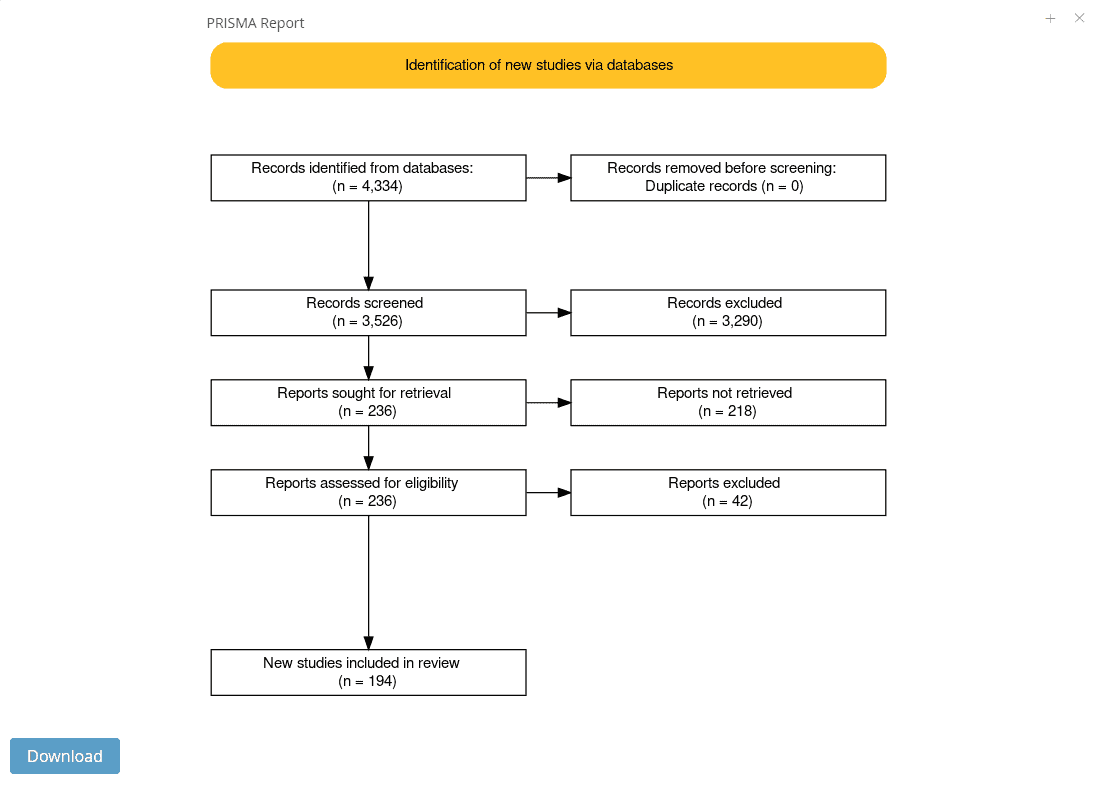
“PRISMA” stands for Preferred Reporting Items for Systematic Reviews and Meta-Analyses. BMJ (OPEN ACCESS) Page MJ, McKenzie JE, Bossuyt PM, Boutron I, Hoffmann TC, Mulrow CD, et al. The PRISMA 2020 statement: an updated guideline for reporting systematic reviews. BMJ 2021;372:n71. doi: 10.1136/bmj.n71
The Interrater Reliability Score Report shows the interrater reliability for all questions at the selected screening level. The report shows two separate interrater reliability scores: 1) the Fleiss’ Kappa Score, which is an interrater agreement measure between three or more raters; and 2) the Cohen’s Kappa Score, which is a quantitative measure of reliability for two raters that are rating the same thing, corrected for how often that the raters may agree by chance. The contents of the report reflect the current status of the review questions and, numbers and scores will change as conflicting answers are resolved or screening progresses
In the example shown below, you can see that the Fleiss’ Kappa score (shown above the table) is 0.467, which indicates there is moderate disagreement across screeners on the project for Question 1 (“Include this reference?”). The Fleiss’ Kappa Score is a statistical measure for assessing the reliability of agreement between three or more raters.
The Cohen’s Kappa score between each rater is shown in the table below for Question 1 (“Include this reference?”). The number in each cell shows the Cohen’s Kappa scores between two reviewers. The number in parentheses shows the number of references where the reviewers agree, and the denominator shows the total number of references screened by both reviewers. For example, you can see that Rebecca Elmore and Arpit Tandon were not in total agreement (three out of four references screened were in agreement), with a Cohen’s Kappa score of 0.5 between them.
The Interrater reliability report can be exported as an .xlsx file.

Troubleshooting
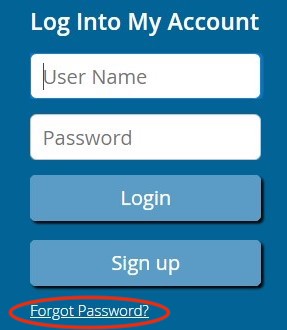
If you forget your username, you can email swift-activescreener@sciome.com. You can change your username from the “Forgot Password” link on the SWIFT-Active Screener Login page (https://swift.sciome.com/activescreener).
From the SWIFT-Active Screener Login page (https://swift.sciome.com/activescreener), click “Forgot Password?”
The predicted progress graph becomes available once you have screened approximately 10% of the total references.
If you would like to change your password, you can do so from this link: https://user.sciome.com/usermanagement/.
To contact the SWIFT-Active Screener team for assistance, email us at swift-activescreener@sciome.com.
SWIFT-Active Screener Tutorial Videos
For brief tutorial video clips of SWIFT-Active Screener, see below:
Introduction to Active Screener
Navigation
Creating a New Project
Uploading References
Inviting Screeners and Changing Project Settings
Screening References
Monitoring Progress
Resolving Conflicts
Managing References
Exporting Data
Alternatively, if you are already logged into SWIFT-Active Screener, click on the icon that looks like a video camera
Sciome LLC
swift-activescreener@sciome.com
Knowledge Base Version (1.0)


